Created in Maya with Paint FX. The hills and the sun are polygons. The sun rays and the grasses are pFX. The sky is a ever-so slightly transparent (to allow the sun rays through) polygon with a sky map.
Jolly 3D Sketchbook
Sunday, March 13, 2011
Monday, March 7, 2011
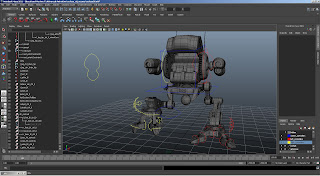
Recluse Mech - FK controls preview
 Here's a quick look at what I've done with the FK controls. The hardest part is done. I've yet to add the rotational controls for the knees and hips, but the feet and toes took the most work and they are finished.
Connections between IK and FK switches and the opposite switch's visibility is yet to come.
Sunday, March 6, 2011
Recluse Mech- IK controls preview
Here is a small preview of the IK controls for the mech. I haven't added FK controls yet, but the IK is pretty much complete, so the FK should be easy enough to add now. After this its expressions and SDK =)
On another note, I have a challenge with some soft/stretch parts of the mesh and having it stick to the joints the way I want it to. Its been pretty much hit and miss experimentally speaking, but I'm sure I'll work out something soon.
On another note, I have a challenge with some soft/stretch parts of the mesh and having it stick to the joints the way I want it to. Its been pretty much hit and miss experimentally speaking, but I'm sure I'll work out something soon.
Wednesday, February 9, 2011
Maya 2011 controller orientation workaround
I've created a simple tutorial which shows the workaround for the problem Maya 2011 has with orienting a controller to its children while remaining neutral in world-space. This is an adaptation of Carlo Sansonetti's technique for controller orientation. In this example, I'm setting up a controller for a foot with the rotation axis at the heel for an advanced foot setup.
Unfortunately there is no voiceover for the video at this moment since I do not own a microphone, so hopefully the text will guide you through what you see in the video.
Here is the tutorial:
Unfortunately there is no voiceover for the video at this moment since I do not own a microphone, so hopefully the text will guide you through what you see in the video.
Here is the tutorial:
1.) Basically, I add in the controller, in this case a nurbs circle, then scale it up a bit.
2.) Then I name it and group it twice, one layer is SDK for whatever sdk controls for later, the top group is the offset group (l_foot_IK_ctrl_O).
3.) I Point Constrain the offset group node (be sure the group is selected, not the shape node) to the ball_jnt.
4.) I then Aim Constrain the offset group node to the toe_jnt.
5.) Next, I delete both constraints, as they are no longer needed, then I shape my controller the way I want it with the shape node CVs.
6.) Next I create a locater node, and parent it to the ball_jnt. I then zero out all the transform attributes for the locater, moving it to and orienting it with the ball_jnt.
7.) Then I go Edit>Unparent the locater, and move it into the place where I want the heel rotation to be.
8.) I select the controller (the shape), hit Insert to move its transform center and hold down V to snap it to the locater, and hit Insert again.
9.) Then I delete the locater node as it is no longer needed at this point. ( you may want to keep it for further snaps and constraints later on down the road though)
Saturday, January 29, 2011
A girl can change her mind can't she?
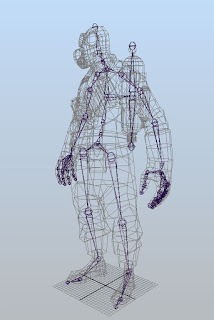
 After consideration I decided to rig the pyro instead of the scout. See here the skeleton I've set up for him prior to any IK, SDK, or controller added. I don't know why I added joints for the gas tank, I want it to stay rigid when the character bends... we'll see if they're necessary...
Sunday, January 23, 2011
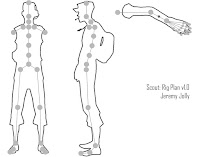
Rig Sheet : Team Fortress 2 Scout
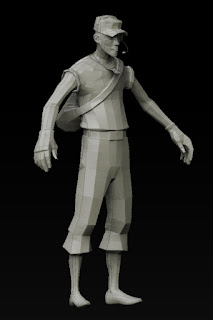
 This quarter I am taking a class called Advanced Animation for Gaming. This weeks project is to plan the layout of a skeletal rig for an existing character mesh. The mesh I've chosen is the Scout from Team Fortress 2.
Here is the general plan. I may decide to revise later with some bone extensions for secondary movement of the necklace and backpack, but right now. I want to keep things simple.

Wednesday, November 3, 2010
A quick sketch
A quick sketch of Nynaeve. I was bored and tired of messing with Zbrush. I was having this thought today: I wonder how many students use the default meshes the Pixologic provides and then builds their "character" from that mesh. I also wonder: Is that cheating? Personally, I believe it is. However, I wonder how often such a thing is overlooked in the academic world, since such variation can come from them. I mean. you could morph the dog mesh into a human if you so desired. Just something I was wondering... my meshes are mine from beginning to end. They might spend a long time being ugly or broken, but damnit they're mine. I was thinking to turn my female mesh into the sketch you see here. That is... once I fix the mesh and learn how to sculpt.
I've been away from 3D CG for a few years with work so I'm new to the whole Zbrush phenomenon; I've always modeled in Maya. The workflow in ZBrush is almost backwards compared to Maya. Or from the middle outwards... or whatever.
I'll get it though. I will. I am.
Subscribe to:
Posts (Atom)

